If you're building any kind of digital product in Kenya—whether it's an e-commerce platform, a booking system, or a subscription service—you'll eventually need to integrate M-Pesa payments. It's not optional anymore; it's expected. M-Pesa has become so ubiquitous that users simply assume your application will accept it.
But here's the thing: M-Pesa integration through Safaricom's Daraja API can feel intimidating at first. There are credentials to manage, endpoints to understand, and a specific flow you need to follow. Miss one step, and nothing works. Get it right, and you've unlocked seamless payment processing for millions of potential customers.
This guide walks you through the entire M-Pesa integration process, from creating your first Daraja account to handling payment callbacks. We'll use a practical example—a movie ticket booking system—to make everything concrete. By the end, you'll understand not just how to integrate M-Pesa, but why each step matters and how all the pieces fit together.
Let's dive in.
The first step in working with M-Pesa integration is creating a Daraja API account. Head over to daraja.safaricom.co.ke and create an account. If you already have one, you can simply log in.
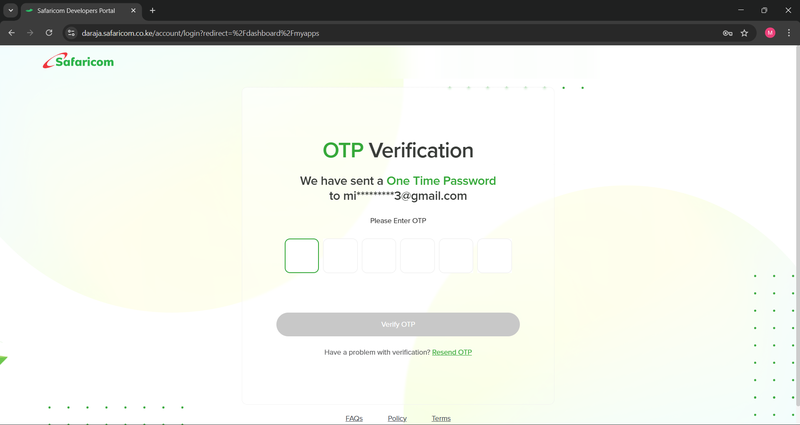
The login process is straightforward but secure. When you attempt to log in, Daraja sends a one-time password (OTP) to your registered email address. Enter this OTP, and you'll gain access to your dashboard. This two-factor authentication ensures that only you can access your developer credentials.
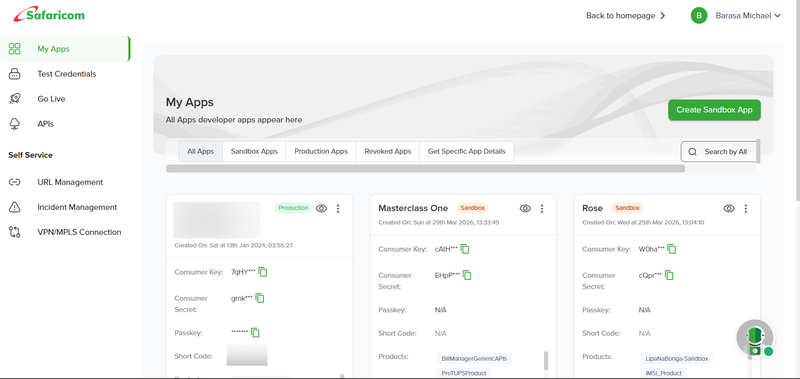
Once you're logged into your dashboard, you'll see options to create "apps." Now, this is where many developers get confused, so let's clear it up right away.
When Daraja talks about creating an "app," it doesn't mean what you might traditionally think of when you hear that word. It's not like Facebook, Twitter, or any social media platform. You're not building a standalone application that lives on Safaricom's servers.
Instead, a Daraja "app" is simply a set of credentials that allows your actual application—whether it's a website, mobile app, or backend service—to communicate with Safaricom's systems. Think of it as getting an access card to a building. The card isn't the building itself; it's just what lets you in.
Creating an app in Daraja is how you obtain the authentication credentials you'll need to make API requests. That's it. The naming is a bit misleading, but once you understand this distinction, everything else makes more sense.
Daraja provides two distinct environments, and understanding the difference between them is crucial.
Sandbox apps are for development and testing. This is where you experiment, break things, and figure out how everything works. When you send money through a sandbox transaction, Safaricom states that it will be returned to you. Now, in practice, this doesn't always happen consistently—sometimes the money comes back, sometimes it doesn't. But the key point is that sandbox is your playground. You're not dealing with real production transactions, so you can test freely without financial risk.
Production apps are for real, live transactions. When you create a production app and integrate it into your system, actual money flows through it. Payments go directly to the Till number or Paybill number associated with that app. This is real business, real money, and real responsibility.
For everything we're doing in this guide, you'll be working primarily with sandbox apps. Only when you're completely confident that everything works should you even think about moving to production.
Here's a practical tip: you can use the same sandbox app for multiple projects during development. Since it's just for testing and demonstrating that your integration works, there's no need to create a new sandbox app for every single project. However, for production, each business or project should have its own dedicated app tied to its specific Till or Paybill number.
Let's walk through creating an app. From your Daraja dashboard, click on "Create App." You'll see a form asking for some information.
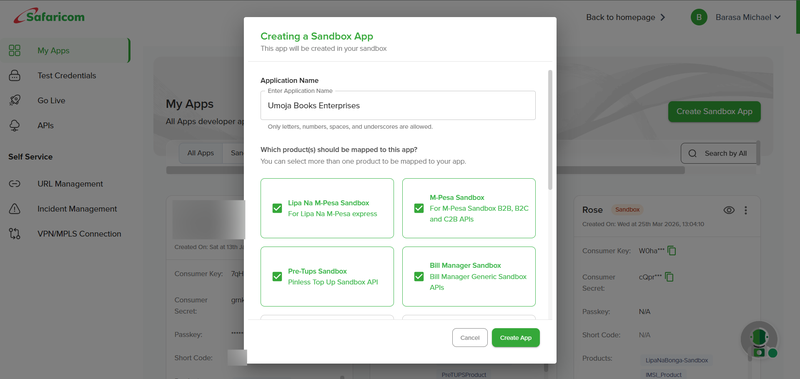
Application Name: This is just a label for your own reference. Daraja has specific rules about what characters you can use—only letters, numbers, spaces, and underscores are allowed. You might call it "Movie Booking System Sandbox" or "E-commerce Test App" or whatever makes sense to you. The name doesn't affect functionality; it's purely organizational.
Products to Map: This is where things get interesting. Daraja exposes numerous APIs that correspond to different Safaricom products. You'll see options like:
- Lipa na M-Pesa (also called M-Pesa Express or STK Push) - This is the main one you'll be using
- M-Pesa Ratiba - For recurring payments, like subscription services
- Business to Business (B2B) - For transactions between businesses
- Business to Customer (B2C) - For disbursements, like sending money to users
- Customer to Business (C2B) - For collecting payments
- Various other specialized APIs
Each product represents a different capability. For a sandbox app, here's the recommendation: select all of them. Why? Because during development, you might realize you need a feature that wasn't part of your initial plan. If you've already selected all products when creating your sandbox app, you can simply use that functionality without having to create another app.
For production apps, however, you should only select the specific products you actually need. This is a security best practice. By limiting which APIs can be used with your production credentials, you prevent anyone from using APIs that could be catastrophic to your business if misused.
Once you've selected your products, click "Create App." Your app will be created and appear in your dashboard.
When you look at your newly created app in the dashboard, you'll see several important pieces of information. Let's break down each one and understand what it's for.
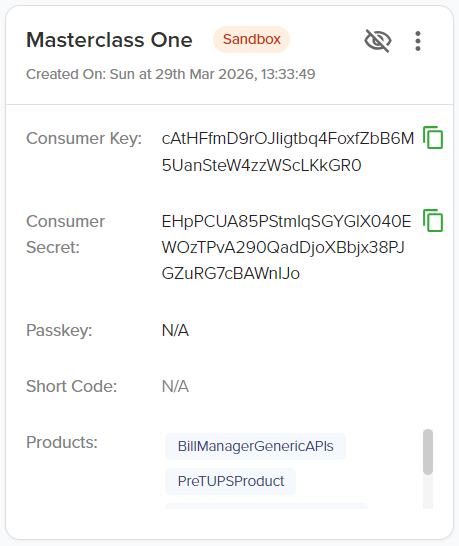
These two credentials work together like a username and password system.
The Consumer Key is your identifier. It tells Safaricom which application is making a request. Think of it like a username—it identifies you but doesn't prove you have permission.
The Consumer Secret is your authentication credential. It's like a password—it proves you're authorized to use this app. Just as you keep passwords secret, you should treat your Consumer Secret the same way. Only share it with developers who are working on the project, or with clients who need to provide it to their development team.
These credentials are what you'll use to tell Safaricom who you are so they can give you an access token. The Consumer Key and Consumer Secret are specifically for obtaining the access token, while the access token itself is what you use for actual payment operations.
The Passkey is a cryptographic string that you'll use when generating passwords for STK Push requests. For production apps, Safaricom sends the Passkey to your registered email after you create the app. You'll receive an email with a subject line like "STK Push Credentials" containing this long, complex string.
For sandbox development, you can use a shared sandbox Passkey since you're just testing. We'll cover exactly how the Passkey is used when we get to the STK Push section.
The business Shortcode is a critical piece of information. In production, you'll see it clearly displayed in your app details. This Shortcode identifies the M-Pesa account that will receive payments.
However—and this is important—for sandbox apps, the Shortcode field sometimes shows "Not Available" instead of providing an actual number. This is a limitation of Safaricom's sandbox environment that hasn't been fully addressed. It can be frustrating, but there's a practical workaround.
Since sandbox is only for testing anyway, and all sandbox transactions work the same way regardless of whose credentials you use, you can simply use a known working sandbox Shortcode. The commonly used sandbox Shortcode is 174379. You just need credentials that demonstrate your application works correctly. You can use the same sandbox credentials across multiple projects during development—there's no security risk because it's all test data anyway.
For production, this isn't an issue. Your production Shortcode will be clearly displayed and will be tied to your actual Till or Paybill number.
For sandbox apps, the security requirements are somewhat relaxed because you're just testing with fake transactions. However, for production credentials, security is paramount. Your production Consumer Key, Consumer Secret, and Passkey should be:
- Never committed to version control systems like Git
- Stored as environment variables or in secure configuration management systems
- Only shared with trusted team members who absolutely need them
- Rotated periodically if there's any suspicion of compromise
Think of your production credentials like the keys to your bank vault. Treat them accordingly.
Before we dive into the technical details, you need to understand that M-Pesa integration revolves around four fundamental concepts. Everything you do with Daraja fits into one of these four categories:
- Getting an Access Token - How you authenticate with Safaricom's systems
- STK Push - How you trigger the payment prompt on a user's phone
- STK Query - How you check the status of a transaction (optional)
- Callback - How you receive the final results from Safaricom
These aren't just random steps; they form the complete picture of how M-Pesa integration works. Let's understand each one in detail.
Before we go further, let's make sure we're all on the same page about what STK Push actually is. STK stands for SIM Toolkit. An STK Push is when you trigger a payment prompt that appears directly on a user's phone, asking them to enter their M-Pesa PIN to authorize a payment.
If you've ever made a payment online and suddenly your phone buzzed with a pop-up asking for your M-Pesa PIN, that was an STK Push. The user doesn't have to manually go to the M-Pesa menu, select "Lipa na M-Pesa," enter your business number, enter the amount, and so on. All that complexity is handled automatically. They just see a prompt asking: "Do you want to pay X shillings to Business Y? Enter your PIN."
This is the fundamental flow you'll be implementing regardless of what kind of application you're building. Whether it's a hotel booking system, a restaurant ordering platform, an SGR ticket purchase system, or an e-commerce checkout, the pattern is the same: the user initiates a payment, receives a prompt on their phone, and either completes or cancels the transaction.
Every interaction with Daraja starts with getting an access token. Let's understand what this is and why it matters.
An access token is a temporary credential that allows you to make requests to Safaricom's API. Instead of sending your Consumer Key and Consumer Secret with every single request (which would be a security risk), you exchange them once for an access token, then use that token for subsequent requests.
The access token is valid for exactly one hour—that's 3,600 seconds. After one hour, the token expires and can no longer be used. This time limitation enhances security by minimizing the exposure of your main credentials.
Now, you might think: "If the token lasts for one hour, I should store it and keep track of when it expires, right? That way I don't have to keep requesting new ones."
Technically, yes, you could do that. But here's the recommended approach that makes your life much simpler: request a fresh access token every time you need to make an API call.
Think about it like this. Imagine there's a building with a reception desk. The receptionist gives you a key that's valid for one hour. You could take that key, go do your work, come back later, check if the hour has passed, and if it has, get a new key. But that requires you to constantly check whether your current key has expired.
Or, you could simply stop by the reception desk every time you need to enter and pick up a fresh key. You never have to worry about whether your current key has expired because you're always getting a new one.
This second approach is what you should do with access tokens. Don't track expiration. Don't try to reuse tokens. Just get a new one each time. It's simpler, more reliable, and the performance overhead is negligible.
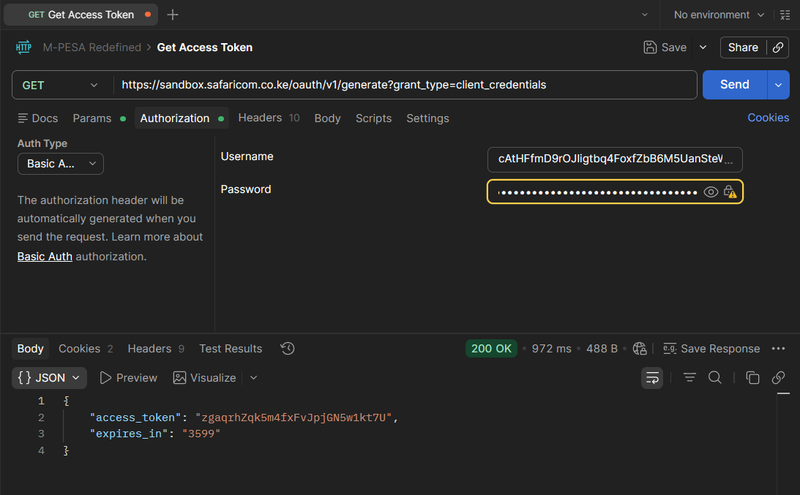
Getting an access token is an HTTP request to a specific endpoint. Let me show you exactly how this works using a tool called Postman, which makes testing API endpoints much easier.
The Endpoint:
For sandbox:
https://sandbox.safaricom.co.ke/oauth/v1/generate?grant_type=client_credentialsFor production:
https://api.safaricom.co.ke/oauth/v1/generate?grant_type=client_credentialsNotice the difference: sandbox URLs use sandbox.safaricom.co.ke while production URLs use api.safaricom.co.ke. This pattern holds true for all Daraja endpoints.
The HTTP Method: GET
This is important. For getting an access token, you use a GET request. Other endpoints will use POST, but this one specifically requires GET.
Authentication: Basic Auth
You need to provide authentication credentials with this request. Specifically, you use what's called Basic Authentication, where:
- Username: Your Consumer Key
- Password: Your Consumer Secret
Making the Request in Postman
Let me walk you through this step by step as if you're sitting next to me:
- Open Postman and create a new collection. Call it something like "M-Pesa Integration" or "Daraja API Testing"
- Inside that collection, create a new request. Name it "Get Access Token"
- Set the request method to GET (use the dropdown menu)
- Paste the endpoint URL into the URL field
- Go to the "Authorization" tab
- From the "Type" dropdown, select "Basic Auth"
- In the "Username" field, paste your Consumer Key (copy it from your Daraja app dashboard)
- In the "Password" field, paste your Consumer Secret (copy it from your Daraja app dashboard)
- Click "Send"
The Response
When the request is successful, you'll receive a JSON response that looks like this:
{
  "access_token": "3TRSAg7mIKHQN...",
  "expires_in": "3599"
}
The access_token is a long string of characters. This is what you'll use for all subsequent API calls. The expires_in tells you how many seconds until this token becomes invalid—in this case, 3,599 seconds, which is essentially one hour.
Every time you click "Send" in Postman with the same credentials, you'll get a different access token. Notice how the token string changes each time. You might see one starting with "3TRSA..." then the next one starts with "UiECH..." and so on. Each one is unique and each one is valid for one hour from the time it was issued.
This is why you don't need to worry about tracking expiration. Just request a new token whenever you need to make an API call.
Now that you know how to get an access token, let's move to the core of M-Pesa integration: the STK Push. To make this concrete and practical, we'll work through a complete example using a movie ticket booking system.
This example helps you see how everything fits together in a real application. Users can browse available movies, select one they want to watch, provide their details, and make a payment. It's complex enough to demonstrate all the key concepts but simple enough to understand clearly.
The patterns you learn here apply to any payment scenario. Whether you're building an e-commerce checkout, a hotel booking system, a subscription platform, or a bill payment system, the fundamental flow remains the same.
Before we touch any payment code, we need to understand how to structure our data. Database design comes first because it determines how you store and retrieve all the information needed for the payment process.
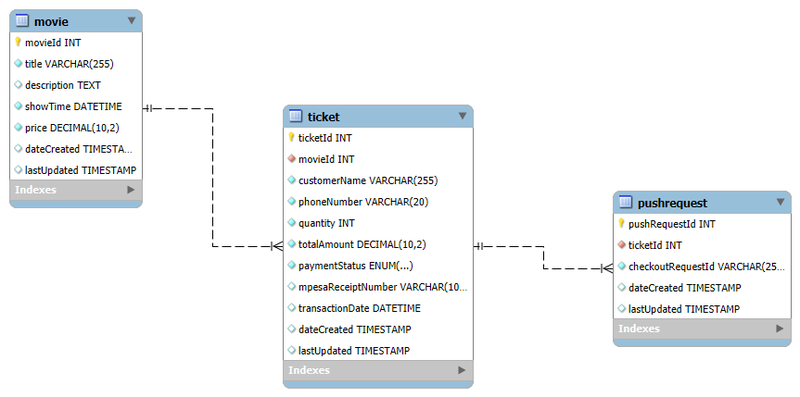
Our system requires three main tables: movie, ticket, and pushrequest. Let's understand each one and why it exists.
The Movie Table
CREATE TABLE IF NOT EXISTS movie (
    movieId INT AUTO_INCREMENT PRIMARY KEY,
    title VARCHAR(255) NOT NULL,
    description TEXT,
    showTime DATETIME NOT NULL,
    price DECIMAL(10, 2) NOT NULL,
    maximumTickets INT NOT NULL DEFAULT 100,
    imageUrl VARCHAR(255),
    dateCreated TIMESTAMP DEFAULT CURRENT_TIMESTAMP,
    lastUpdated TIMESTAMP DEFAULT CURRENT_TIMESTAMP ON UPDATE CURRENT_TIMESTAMP
);
You cannot have ticket sales without movies to sell tickets for, so this table stores all the movie information. Each movie has:
- A unique
movieId(auto-incremented by the database) - A
titlelike "Top Gun: Maverick" or "Oppenheimer" - A
descriptioncontaining a brief synopsis - A
showTimeindicating when the movie will be screened - A
priceshowing how much one ticket costs - A
maximumTicketslimit to prevent overselling - An
imageUrlfor displaying movie posters - Timestamp fields for tracking when records were created and updated
Think about any movie booking website you've used, or even Netflix. You see the movie name, a description of what it's about, information about when it's available, and pricing details. All of that information needs to be stored somewhere—that's what this table does.
The Ticket Table
CREATE TABLE IF NOT EXISTS ticket (
    ticketId INT AUTO_INCREMENT PRIMARY KEY,
    movieId INT NOT NULL,
    customerName VARCHAR(255) NOT NULL,
    phoneNumber VARCHAR(20) NOT NULL,
    quantity INT NOT NULL,
    totalAmount DECIMAL(10, 2) NOT NULL,
    paymentStatus ENUM('Pending', 'Paid', 'Failed') NOT NULL DEFAULT 'Pending',
    mpesaReceiptNumber VARCHAR(100),
    transactionDate DATETIME,
    dateCreated TIMESTAMP DEFAULT CURRENT_TIMESTAMP,
    lastUpdated TIMESTAMP DEFAULT CURRENT_TIMESTAMP ON UPDATE CURRENT_TIMESTAMP,
    CONSTRAINT fk_Ticket_Movie FOREIGN KEY (movieId)
        REFERENCES movie(movieId) ON DELETE CASCADE
);
A movie can have multiple tickets—thirty different people might buy tickets for the same movie. The relationship between movies and tickets is one-to-many. One movie, many tickets.
Let's walk through each field in the ticket table:
ticketId: An auto-incrementing primary key. Understanding auto-increment is important. Think about admission numbers in a school system. One student gets admission number 1, the next gets 2, then 3, then 4, and so on. The database handles this automatically so there are no conflicts or duplicates. Same principle here—ticket IDs are assigned automatically.
movieId: Which movie is this ticket for? If a user buys a ticket for "Oppenheimer" and that movie has a movieId of 4 in the database, this field stores 4. It's a foreign key linking to the movie table.
customerName: The name of the person buying the ticket, as entered by them in the booking form.
phoneNumber: The customer's phone number. This is crucial because it's where the STK Push prompt will be sent.
quantity: How many tickets are they purchasing? Someone might buy 3 tickets for their family.
totalAmount: The calculated total cost. If a movie ticket costs 15 shillings and they want 3 tickets, the total is 45 shillings. This is calculated as quantity × price.
paymentStatus: This deserves special attention because it's central to how the system works. Let's talk about it in detail.
When a ticket record is first created, before any payment has been made, you don't know whether the transaction will succeed or fail. The transaction hasn't happened yet. The user hasn't entered their PIN. They haven't confirmed anything. At this point, the outcome is completely unknown.
A transaction can be successful, or it can fail. And there are many reasons why a transaction might fail:
- The user might not have enough money in their M-Pesa account. If someone wants to pay 39 shillings but only has 30 shillings available, the transaction will fail.
- The user's phone might be turned off. If the phone is off, Safaricom cannot deliver the payment prompt, so the transaction fails.
- There might be network issues preventing the transaction from completing.
- There might be system issues at Safaricom.
- The user might enter the wrong PIN. After several wrong attempts, the transaction fails.
- The user might simply cancel the transaction when they see the prompt.
Given all these possible outcomes, you need a way to track the status of each ticket. The paymentStatus field can have three possible values:
- Pending - The payment hasn't been completed yet and we're waiting to see what happens
- Paid (or "Successful") - The payment went through completely
- Failed - Something went wrong and the payment didn't complete
When you first create a ticket record, before initiating any payment, you set the paymentStatus to 'Pending'. You're not sure what will happen, so you mark it as pending. Later, based on the results you receive from Safaricom via the callback, you'll update this status to either 'Paid' or 'Failed'.
mpesaReceiptNumber: This field stores the confirmation code that Safaricom sends when a payment is successful. If you look at your M-Pesa messages, you'll see codes like "UCH2G9LNVQ" or similar combinations of letters and numbers. These are receipt numbers, and they're important because they serve as proof that a payment was made.
But here's the key insight: when you create a ticket record initially, before any payment has happened, there is no receipt number yet. You can't have a receipt for a payment that hasn't occurred. Therefore, you set this field to NULL initially.
transactionDate: This stores when the payment was actually completed. If you look at your M-Pesa messages, you'll see something like "UCH2G9LNVQ confirmed. You have sent 20 shillings to Business Name on 17th of March 2026 at 12:23 PM." The date and time shown there is the transaction date.
Again, when you're first creating the ticket record, the transaction hasn't happened yet, so there is no transaction date. You set this field to NULL initially as well.
The timestamp fields dateCreated and lastUpdated are handled automatically by the database and track when the record was created and last modified.
The PushRequest Table
CREATE TABLE IF NOT EXISTS pushrequest (
    pushRequestId INT AUTO_INCREMENT PRIMARY KEY,
    ticketId INT NOT NULL,
    checkoutRequestId VARCHAR(255) NOT NULL,
    dateCreated TIMESTAMP DEFAULT CURRENT_TIMESTAMP,
    lastUpdated TIMESTAMP DEFAULT CURRENT_TIMESTAMP ON UPDATE CURRENT_TIMESTAMP,
    CONSTRAINT fk_PushRequest_Ticket FOREIGN KEY (ticketId)
        REFERENCES ticket(ticketId) ON DELETE CASCADE
);
This table might seem mysterious at first. Why do we need it? The answer becomes clear when we understand the CheckoutRequestID concept, which we'll cover in detail shortly. For now, just know that this table exists to link Safaricom's transaction identifiers back to our ticket records.
Let's walk through the complete user experience to understand how all the pieces fit together.
Step 1: Display Available Movies
The system queries the movie table and shows all available movies to the user. Each movie displays its title, description, show time, and price. The user can browse through these options.
Step 2: User Selects a Movie
The user sees a movie they want to watch—let's say "Oppenheimer"—and clicks a "Book Now" button. This selection captures the movieId which we'll need for the next steps.
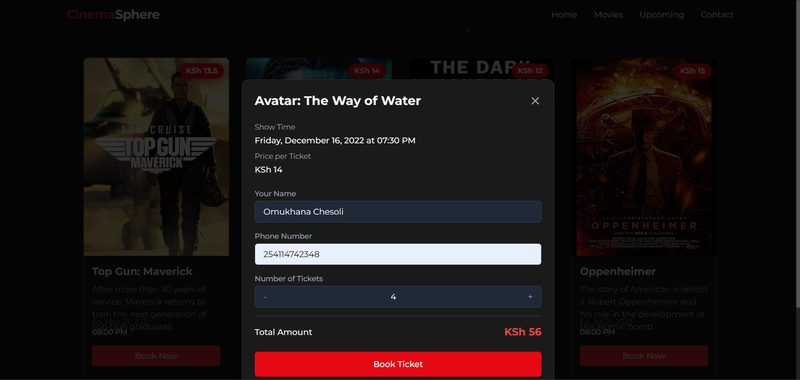
Step 3: Collect Booking Details
The system presents a booking form asking for:
- Customer name
- Phone number
- How many tickets they want to purchase
Let's say the user enters:
- Name: "Barasa Michael"
- Phone: "0114742348"
- Quantity: 3 tickets
The show time is displayed (July 21st, 2023 at 8 PM), and the price shows 15 shillings per ticket. When the user specifies 3 tickets, the system automatically calculates that the total amount is 45 shillings (3 × 15).
Step 4: User Submits the Booking
The user clicks a "Book Ticket" or "Proceed to Payment" button. This sends all the booking information to your backend system.
This flow is consistent across different types of systems. Whether you're building a hotel booking system, a restaurant ordering platform, SGR ticket booking, or anything else, the pattern is similar: display options, user makes a selection, collect their details, they submit, and then you process the payment.
Here's something that trips up many developers: you must create the ticket record in your database BEFORE you initiate the payment. This is not optional. This is mandatory.
Let me be very clear about the sequence:
- User submits their booking information
- You create the ticket record in the database first
- Then you initiate the STK Push
Not the other way around. The database record comes first.
Think about it from a practical perspective. When Safaricom sends you the payment results later (through the callback), you need somewhere to store that information. You need a ticket record to update. If you tried to initiate the payment first and create the record later, you'd have payment results with nowhere to put them.
Additionally, you need the ticket ID to link the payment request to a specific booking. This becomes crucial when handling concurrent transactions, as we'll see shortly.
When the user submits their booking information, your backend receives:
- The selected
movieId - The
customerName - The
phoneNumber - The
quantity
You use this information to create a new ticket record:
INSERT INTO ticket (
    movieId,
    customerName,
    phoneNumber,
    quantity,
    totalAmount,
    paymentStatus,
    mpesaReceiptNumber,
    transactionDate
) VALUES (
    4,                    -- movieId from user selection
    'Barasa Michael',     -- customerName from user input
    '0114742348',         -- phoneNumber from user input
    3,                    -- quantity from user input
    45.00,                -- calculated: 3 × 15
    'Pending',            -- initial status
    NULL,                 -- no receipt yet
    NULL                  -- no transaction date yet
);
Let's walk through where each value comes from:
movieId: From the user's selection. If they selected Oppenheimer and that movie has a movieId of 4, you use 4.
customerName, phoneNumber, quantity: Directly from what the user entered in the form.
totalAmount: You calculate this by querying the movie table to get the price, then multiplying by the quantity. If the price is 15 and quantity is 3, the total is 45.
paymentStatus: Set to 'Pending' because we don't know yet whether the payment will succeed or fail.
mpesaReceiptNumber: Set to NULL because the transaction hasn't happened yet, so there's no receipt.
transactionDate: Set to NULL for the same reason—no transaction yet means no transaction date.
After this INSERT statement executes, you get back a ticketId. Let's say it returns 67. This ticket ID is important—you'll need it for the next steps.
Before you can initiate the STK Push, you need to ensure the phone number is in the correct format. Safaricom has specific requirements, and if you don't format the number correctly, your API request will fail.
Users can enter their phone numbers in various ways:
+254114742348(with country code and plus sign)0114742348(starting with zero)+254725820898(another number with plus)0725820898(another number with zero)
All of these are valid ways that users might input their phone numbers, but Safaricom requires a specific format: 254XXXXXXXXX (no plus sign, no leading zero, just 254 followed by the digits).
The rules are straightforward:
- If there's a plus sign (
+) at the beginning, remove it - If the number starts with a zero (
0), replace that zero with254
Let's see the transformations:
+254114742348becomes254114742348(remove the plus)0114742348becomes254114742348(replace 0 with 254)+254725820898becomes254725820898(remove the plus)0725820898becomes254725820898(replace 0 with 254)
Every phone number must be converted to start with 254 without a plus sign. This formatting is a requirement from Safaricom. If you don't format correctly, your STK Push request will be rejected.
You must implement this formatting logic in your code before making the STK Push request. The formatted number is what you'll use for all M-Pesa API calls.
At this point, you've completed several important steps:
✓ Displayed movies to the user
✓ User selected a movie
✓ Collected their booking details (name, phone, quantity)
✓ Created a ticket record in the database with status "Pending"
✓ Formatted the phone number correctly
Now you're ready to perform the actual STK Push—to send a request to Safaricom asking them to prompt the user's phone with a payment request.
But before you can do that, you need to understand all the parameters that an STK Push request requires. There are quite a few of them, and each one serves a specific purpose.
Remember what we discussed earlier about access tokens? Before making the STK Push request, you need to get a fresh access token. Don't try to reuse an old one. Just make a quick GET request to the access token endpoint with your Consumer Key and Consumer Secret, get the new token, and you're ready to proceed.
This is the pattern for every STK Push:
- Get access token
- Use that token to make STK Push request
Simple and reliable.
For sandbox
https://sandbox.safaricom.co.ke/mpesa/stkpush/v1/processrequestFor production
https://api.safaricom.co.ke/mpesa/stkpush/v1/processrequestHTTP Method: POST
Notice this is different from getting an access token, which used GET. For STK Push, you use POST.
Authorization: Bearer Token
This is also different from the access token request. For STK Push, you don't use Basic Auth. Instead, you use what's called a Bearer Token. You go to the Authorization tab in Postman, select "Bearer Token," and paste in the access token you just received from the previous request.
Headers:
You need to set a header indicating that you're sending JSON data:
Content-Type: application/json
Body:
The request body contains all the parameters Safaricom needs to process the payment. This is where it gets detailed, so let's go through each parameter carefully.
The STK Push request requires eleven parameters. Understanding each one and where its value comes from is essential for successful integration.
This is your business shortcode—the M-Pesa number that will receive the payment.
For production: You'll find this in your Daraja app dashboard. It's clearly displayed in your production app details.
For sandbox: As we discussed earlier, the sandbox dashboard sometimes shows "Not Available" instead of providing a shortcode. The practical solution is to use the standard sandbox shortcode: 174379
Since sandbox is only for testing and all sandbox transactions work the same way, using a shared sandbox shortcode is perfectly fine. You just need to demonstrate that your application works correctly.
This is one of the more complex parameters because it's not something you simply look up—it's something you generate.
The password is created by concatenating three pieces of information and then encoding the result using Base64 encoding:
Password = Base64Encode(BusinessShortCode + Passkey + Timestamp)
Let's break this down step by step.
BusinessShortCode: We already know this—it's 174379 for sandbox.
Passkey: This is the cryptographic string we discussed earlier. For production, it's sent to your email when you create the app. For sandbox, you can use the standard sandbox passkey:
bfb279f9aa9bdbcf158e97dd71a467cd2e0c893059b10f78e6b72ada1ed2c919
Timestamp: This is the current date and time in the format YYYYMMDDHHmmss. For example, if the current time is March 17th, 2026 at 19:28:48, the timestamp is 20260317192848.
Concatenation: You join these three pieces together with no spaces or separators:
174379bfb279f9aa9bdbcf158e97dd71a467cd2e0c893059b10f78e6b72ada1ed2c91920260317192848
Base64 Encoding: You then take this long concatenated string and encode it using Base64 encoding. Base64 is a standard encoding method that converts data into a specific format. You don't need to understand the mathematical details of how it works—you just need to know that your programming language has built-in functions to perform Base64 encoding.
For example, in Python there's a base64 library. In JavaScript there are Base64 encoding functions. You take your concatenated string, pass it to the encoding function, and it gives you back the encoded result.
This encoded result is what you use as the Password parameter.
Here's a simple Python script that demonstrates the password generation process:
import base64
from datetime import datetime

BUSINESS_SHORT_CODE = "174379"
PASSKEY = "bfb279f9aa9bdbcf158e97dd71a467cd2e0c893059b10f78e6b72ada1ed2c919"
timestamp = datetime.now().strftime("%Y%m%d%H%M%S")

# Concatenate the three pieces
concatenated = BUSINESS_SHORT_CODE + PASSKEY + timestamp

# Encode to Base64
password = base64.b64encode(concatenated.encode()).decode()

print(f"Generated Password: {password}")
When you run this, it outputs the Base64-encoded password that you'll use in your STK Push request.
This is simply the current date and time in the format YYYYMMDDHHmmss.
Important: You must use the current time when making the request. Don't use a hardcoded or old timestamp.
The timestamp serves an important purpose: it makes each request unique. No two moments in time are exactly the same. The second that just passed will never occur again. By using the current timestamp, you ensure that each request is unique, which helps prevent duplicate transactions and provides a clear audit trail.
Note that you use the same timestamp for both generating the password and as the Timestamp parameter. Don't generate the password with one timestamp and then use a different timestamp for this parameter—they must match.
This parameter can have one of two values, depending on whether you're using a Paybill or a Till number:
"CustomerPayBillOnline" - Use this if you're using a Paybill number
"CustomerBuyGoodsOnline" - Use this if you're using a Till number
The choice depends on what type of M-Pesa number your business is using. Paybill numbers are typically used for businesses that receive payments for services or bills. Till numbers are typically used for businesses selling goods.
For our sandbox testing with the standard sandbox shortcode, we use "CustomerPayBillOnline".
This is the payment amount in whole numbers only. Do not use decimal numbers. The amount must be an integer.
If the total for three tickets is 45 shillings, you put 45.
If someone is buying goods worth 30,000 shillings and you give them a 1,000 shilling discount (making the final amount 29,000), you put 29000.
For testing, use 1 to represent one shilling. There's no reason to test with large amounts and risk losing money. One shilling is sufficient to verify that everything works correctly.
This is the phone number of the customer making the payment. You use the formatted phone number that you prepared earlier—the one starting with 254.
If the user's phone number is 254114742348, that's what you put here.
This represents the organization receiving the money.
For CustomerPayBillOnline (Paybill): PartyB is typically the same as the BusinessShortCode. They're the same value.
For CustomerBuyGoodsOnline (Till): PartyB is the Till number, which is different from the shortcode. For Till numbers, Safaricom provides the PartyB value separately when they set up your production account.
For our sandbox testing with CustomerPayBillOnline, PartyB is 174379 (same as the BusinessShortCode).
This is the phone number that will receive the STK Push prompt. It's the same value as PartyA.
You might wonder why this parameter exists if it's the same as PartyA. That's simply how the API is designed. You provide the same phone number in both places.
This is critically important, and we'll discuss it in much greater detail in a later section.
For now, understand that the CallBackURL is an endpoint on your server where Safaricom will send the results of the transaction. When the user completes or cancels the payment, Safaricom sends the result to this URL.
Critical requirement: The URL must be a complete HTTPS URL. It must use HTTPS, not HTTP. Safaricom requires this for security.
This is a reference for the transaction, with a maximum of 12 characters.
You might be tempted to make this dynamic—perhaps using it to store an order number or invoice number. However, the 12-character limit makes this problematic. If you use something like "Invoice" plus a number, and that number grows large enough, you'll exceed 12 characters.
The recommendation is to keep this simple and static. Use something like "Invoice" or "Payment" or "Ticket" or another short, fixed value. Don't try to make it dynamic because the character limit will cause problems.
This is a description of the transaction, with a maximum of 13 characters.
The same limitations apply here as with AccountReference. The 13-character limit makes it difficult to use dynamic values. Keep it simple with something like "Ticket" or "Payment" or another short description.
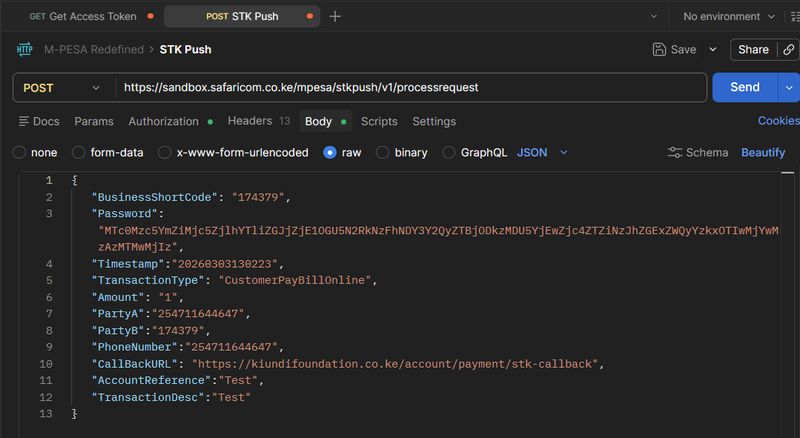
Now that you understand all the parameters, let's see what the complete request looks like.
In Postman, you create a new POST request. You set the endpoint URL, add the Bearer Token authorization with your access token, set the Content-Type header to application/json, and create the request body:
{
  "BusinessShortCode": "174379",
  "Password": "MTc0Mzc5YmZiMjc5ZjlhYTliZGJjZjE1OGU5N2RkNzFhNDY3Y2QyZTBjODkzMDU5YjEwZjc4ZTZiNzJhZGExZWQyYzkxOTIwMjYwMzE3MTkyODQ4",
  "Timestamp": "20260317192848",
  "TransactionType": "CustomerPayBillOnline",
  "Amount": 1,
  "PartyA": "254114742348",
  "PartyB": "174379",
  "PhoneNumber": "254114742348",
  "CallBackURL": "https://yourdomain.com/api/mpesa/callback",
  "AccountReference": "Ticket",
  "TransactionDesc": "Payment"
}
When you send this request and everything is correct, you'll receive a response from Safaricom.
The response from Safaricom contains several fields. Let's look at what a successful response looks like:
{
  "MerchantRequestID": "29115-34620561-1",
  "CheckoutRequestID": "ws_CO_20052025195358733114742348",
  "ResponseCode": "0",
  "ResponseDescription": "Success. Request accepted for processing",
  "CustomerMessage": "Success. Request accepted for processing"
}
ResponseCode and ResponseDescription tell you whether Safaricom accepted your request. A ResponseCode of "0" with a ResponseDescription of "Success. Request accepted for processing" means Safaricom has successfully sent the payment prompt to the user's phone.
This is crucial to understand: This response does NOT mean the payment is complete. It only means the prompt was successfully delivered to the user's phone.
At this point, the user sees a prompt on their phone showing:
- The amount they're being asked to pay
- Your business name
- A request to enter their M-Pesa PIN
The user can now either:
- Enter their PIN and complete the payment
- Cancel the transaction
- Ignore it and let it time out
Among all the fields in the STK Push response, the CheckoutRequestID is the most critical. You must understand why this field is so important and what you need to do with it.
Imagine you're building a successful movie booking platform. At any given moment during peak hours, you might have one hundred people all trying to buy tickets simultaneously. Your system sends one hundred STK Push requests to Safaricom, one for each customer. Safaricom processes all these requests and will eventually send one hundred responses back to your system through the callback.
Now here's the problem: When those callback responses arrive, how do you know which response belongs to which ticket?
Let's make this concrete. Say two different users both happen to buy three tickets to different movies, and both orders total 45 shillings. When a callback arrives saying "45 shillings was paid," which ticket was it for? The person who bought three Oppenheimer tickets? Or the person who bought three Barbie tickets?
You need a way to uniquely identify each transaction. This is exactly what the CheckoutRequestID provides.
Every STK Push request generates a unique CheckoutRequestID. This ID appears in two places:
- In the initial response when you make the STK Push request
- Later in the callback when Safaricom sends you the final transaction results
By matching the CheckoutRequestID from the callback to the CheckoutRequestID you stored earlier, you can determine exactly which ticket a particular payment result belongs to.
The format looks like this: ws_CO_20052025195358733114742348
It's a unique string that identifies this specific payment request.
Remember that pushrequest table we created earlier? This is where it comes into play.
After you receive the STK Push response, you immediately create a record linking the CheckoutRequestID to your ticketId:
INSERT INTO pushrequest (ticketId, checkoutRequestId)
VALUES (67, 'ws_CO_20052025195358733114742348');
This creates the connection you'll need later. You're saying: "The CheckoutRequestID ws_CO_20052025195358733114742348 is associated with ticket number 67."
When the callback arrives later, it will include this same CheckoutRequestID. You'll query the pushrequest table:
SELECT ticketId
FROM pushrequest
WHERE checkoutRequestId = 'ws_CO_20052025195358733114742348';
This query returns 67, and now you know: "This callback is about ticket 67." You can then update the correct ticket record with the payment results.
This is the essential link that makes everything work in a high-traffic, concurrent environment.
After you've initiated the STK Push and stored the CheckoutRequestID, your system enters a waiting state. This is an important concept to grasp.
You are no longer in control of the process. The user has the payment prompt on their phone. They might:
- Complete it immediately
- Wait a few minutes before deciding
- Cancel it
- Simply ignore it
- Experience network issues
- Have their phone turned off
Any number of things might happen, and you cannot predict or control them.
Your system must wait for Safaricom to send you the results. You are not actively checking or polling for results. You are passively waiting for Safaricom to contact you.
This is what the callback is for. Safaricom will make an HTTP request to your CallBackURL when the transaction reaches a final state—whether that state is success or failure.
During this waiting period, your user interface might show the user a message like:
- "Transaction processing. Please check your phone."
- "Waiting for payment confirmation..."
- "Please enter your PIN on your phone to complete the payment."
This keeps the user informed that something is happening and they shouldn't navigate away or refresh the page.
The waiting period is entirely normal. It's how the asynchronous nature of M-Pesa integration works. Your application initiates the request, then waits for the callback.
The callback is perhaps the most important part of the entire M-Pesa integration, and it's also where many developers encounter confusion. Let's make sure you understand exactly what it is and how it works.
A callback is an endpoint that you create on your server specifically to receive results from Safaricom.
Think about the endpoints in any application you've built. If you've created a system with user registration, you have an endpoint for handling registration. If you have login functionality, you have an endpoint for handling login. If you have profile updates, you have an endpoint for that.
An endpoint is simply a URL on your server that handles specific functionality. For example:
https://clubmoto.co.ke/register- handles user registrationhttps://clubmoto.co.ke/login- handles loginhttps://clubmoto.co.ke/logout- handles logouthttps://clubmoto.co.ke/profile- displays user profiles
Each endpoint receives certain data, processes it, and returns a response.
The callback URL is exactly the same concept. It's an endpoint you create specifically for receiving M-Pesa transaction results. When Safaricom finishes processing a transaction—whether it succeeds or fails—Safaricom makes an HTTP POST request to your callback URL, sending the transaction details in the request body.
There's one critical requirement for the callback URL: it must use HTTPS, not HTTP.
HTTP is unencrypted, meaning data travels in plain text. HTTPS is encrypted, protecting the transaction data in transit. Safaricom requires this for security—they won't send sensitive payment information over an unencrypted connection.
Your callback URL must be:
- On a server with a valid SSL certificate
- Publicly accessible so Safaricom's servers can reach it
- Able to handle POST requests
When Safaricom sends transaction results to your callback URL, the structure of the data depends on whether the transaction was successful or failed.
{
  "Body": {
    "stkCallback": {
      "MerchantRequestID": "38c2-4f3b-9aa9-1a2ea6ec7e4d1070625",
      "CheckoutRequestID": "ws_CO_20052025195358733114742348",
      "ResultCode": 0,
      "ResultDesc": "The service request is processed successfully.",
      "CallbackMetadata": {
        "Item": [
          {
            "Name": "Amount",
            "Value": 50
          },
          {
            "Name": "MpesaReceiptNumber",
            "Value": "TEE2QR5JMI"
          },
          {
            "Name": "Balance"
          },
          {
            "Name": "TransactionDate",
            "Value": 20250514201201
          },
          {
            "Name": "PhoneNumber",
            "Value": 254114742348
          }
        ]
      }
    }
  }
}
Let's break down the important fields:
ResultCode: A value of 0 indicates success. Any non-zero value indicates failure.
ResultDesc: A text description of the result. For success, it says something like "The service request is processed successfully."
CallbackMetadata: This section only appears for successful transactions. It contains an array of items with payment details:
- Amount: How much was paid (50 in this example)
- MpesaReceiptNumber: The confirmation code (TEE2QR5JMI in this example)
- TransactionDate: When payment was completed, in format YYYYMMDDHHmmss (20250514201201 means May 14, 2025 at 20:12:01)
- PhoneNumber: Which number made the payment (254114742348)
{
  "Body": {
    "stkCallback": {
      "MerchantRequestID": "38c2-4f3b-9aa9-1a2ea6ec7e4d1070625",
      "CheckoutRequestID": "ws_CO_14052025201149444114742348",
      "ResultCode": 1032,
      "ResultDesc": "Request cancelled by user"
    }
  }
}
For failed transactions, the structure is simpler:
ResultCode: A non-zero value (1032 in this example) indicates failure ResultDesc: Explains what went wrong ("Request cancelled by user") No CallbackMetadata: Since the payment didn't complete, there's no receipt number, no transaction date, and no amount actually paid
Different result codes indicate different failure reasons:
- User cancelled the transaction
- Insufficient funds
- Wrong PIN entered
- Phone unreachable
- Timeout
- System error
When your callback endpoint receives data from Safaricom for a successful transaction, here's exactly what you need to do:
Step 1: Extract the CheckoutRequestID
From the callback payload, extract the CheckoutRequestID. In our example, it's ws_CO_20052025195358733114742348.
Step 2: Find the Associated Ticket
Query your pushrequest table to find which ticket this CheckoutRequestID is associated with:
SELECT ticketId
FROM pushrequest
WHERE checkoutRequestId = 'ws_CO_20052025195358733114742348';
This returns the ticket ID—let's say it's 67.
Step 3: Extract Payment Details
From the CallbackMetadata section of the payload, extract:
- The
MpesaReceiptNumber(e.g., "TEE2QR5JMI") - The
TransactionDate(e.g., 20250514201201)
Step 4: Update the Ticket Record
Update the ticket record with the payment details:
UPDATE ticket
SET
    paymentStatus = 'Paid',
    mpesaReceiptNumber = 'TEE2QR5JMI',
    transactionDate = '2025-05-14 20:12:01'
WHERE ticketId = 67;
Notice:
paymentStatuschanges from 'Pending' to 'Paid'mpesaReceiptNumbergets the actual receipt numbertransactionDategets the actual date and time (you may need to parse the timestamp format from YYYYMMDDHHmmss to a proper DATETIME)
Step 5: Send User Notifications (Optional but Recommended)
This is the appropriate time to send any user notifications. If you want to send a confirmation email telling the customer their payment was successful and here are their tickets, you send that email now. If you want to send an SMS with their ticket details, you send it now.
All communications about successful payment happen in the callback handler after you've updated the database.
Step 6: Respond to Safaricom
After processing the successful payment, you must send a response back to Safaricom. You send an HTTP 200 status code with a simple acknowledgment:
{
  "ResultCode": 0,
  "ResultDesc": "Success"
}
This response does not indicate whether the payment was successful—Safaricom already knows that. It simply acknowledges that you received their callback. You're telling them: "I got your message, thank you."
For failed transactions, the process is similar but simpler:
Step 1: Extract the CheckoutRequestID
Same as before—extract it from the callback payload.
Step 2: Find the Associated Ticket
Query the pushrequest table:
SELECT ticketId
FROM pushrequest
WHERE checkoutRequestId = 'ws_CO_14052025201149444114742348';
This returns the ticket ID—let's say it's 67.
Step 3: Update the Ticket Record
For failures, you only update the payment status:
UPDATE ticket
SET paymentStatus = 'Failed'
WHERE ticketId = 67;
Notice:
paymentStatuschanges from 'Pending' to 'Failed'mpesaReceiptNumberremains NULL (there's no receipt because payment didn't complete)transactionDateremains NULL (no successful transaction means no transaction date)
You might optionally store the ResultDesc somewhere for debugging or customer support purposes, but it's not required.
Step 4: Send User Notifications (Optional)
You might want to notify the user that payment failed. You could send an email or SMS saying something like "Your payment was not completed. Please try again." This helps the user understand what happened and gives them an opportunity to retry.
Step 5: Respond to Safaricom
Critically important: You still send an HTTP 200 response to Safaricom, even for failed transactions.
{
  "ResultCode": 0,
  "ResultDesc": "Success"
}
This confuses some developers. Why are we sending "Success" when the payment failed?
Because the 200 response isn't about whether the payment succeeded. It's about whether you successfully received the callback. You're telling Safaricom: "I got your message about the failed payment. Thank you for informing me."
Safaricom already knows the payment failed—they're the ones telling you about it. What they need to know is whether you received that information. That's what the 200 response confirms.
If you don't send a 200 response, Safaricom might retry sending the callback, thinking you didn't receive it. Always acknowledge receipt, regardless of the payment outcome.
After covering access tokens, STK Push, and callbacks, there's one more piece to discuss: STK Query. But first, let me be very clear about something.
STK Query is optional. You can build a fully functional M-Pesa integration without ever using STK Query. The callback is what handles the actual processing of payment results.
So why does STK Query exist, and when might you want to use it?
Remember that after you initiate an STK Push, there's a waiting period. The user needs to check their phone, enter their PIN, and confirm the payment. During this time, your application is waiting for the callback from Safaricom.
But from the user's perspective on your website or app, it might look like nothing is happening. They might wonder:
- Is the system working?
- Did the payment go through?
- Should I try again?
- Did something go wrong?
STK Query allows you to proactively check the status of a transaction and provide feedback to the user. You could poll Safaricom every few seconds, asking for the status of the transaction, and update your user interface to show:
- "Waiting for payment..."
- "Payment successful"
- "Payment failed"
This makes the user experience smoother because they get immediate feedback rather than just seeing a blank waiting screen.
However, there are important limitations you must understand about STK Query
It's Not Reliable for Database Updates
The callback is the authoritative source of transaction results. STK Query can fail due to:
- Rate limiting (Safaricom limits how many queries you can make)
- Network issues
- Temporary system problems
If you relied on STK Query to update your database and the query failed, you'd have incorrect data. That's why you must always use the callback for database updates, never STK Query.
Rate Limiting
Safaricom implements rate limiting on STK Query requests. If you send too many queries in a short period, Safaricom will start rejecting your requests with error responses. This makes sense from their perspective—they don't want their systems overwhelmed by constant polling.
But it means you can't rely on STK Query being available whenever you want.
Given these limitations, STK Query is best used sparingly and only for enhancing the user interface.
You might query once or twice during the waiting period to show the user that their transaction is being processed. But you never use it as the primary mechanism for determining transaction outcomes. That's what the callback is for.
Think of it this way:
- Callback: The authoritative, reliable source of transaction results. Always process here.
- STK Query: An optional UI enhancement to improve user experience. Never rely on it for critical functionality.
If you decide to use STK Query, the process is similar to other API calls.
Endpoint
For sandbox:
https://sandbox.safaricom.co.ke/mpesa/stkpushquery/v1/queryFor production:
https://api.safaricom.co.ke/mpesa/stkpushquery/v1/queryHTTP Method: POST
Authorization: Bearer Token (using a fresh access token)
Required Parameters:
- BusinessShortCode - Same shortcode you used for the STK Push
- Password - Generated the same way as for STK Push (Base64 encoding of Shortcode + Passkey + Timestamp)
- Timestamp - Current time in YYYYMMDDHHmmss format
- CheckoutRequestID - The ID from the original STK Push request
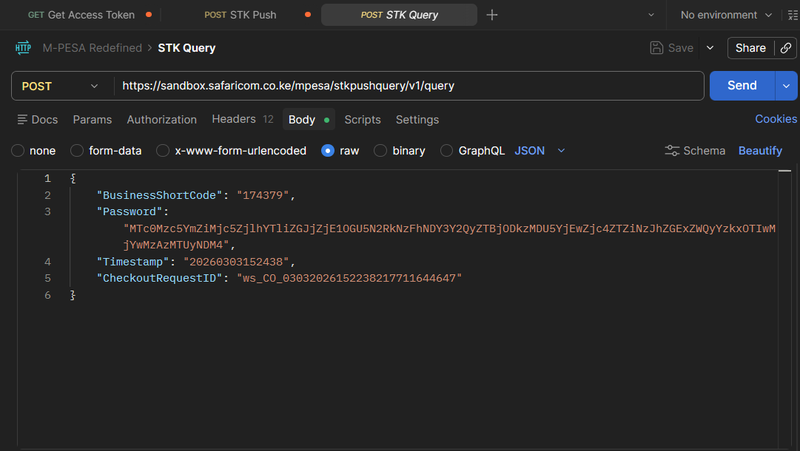
When you send this query, Safaricom responds with the current status of the transaction. The response structure is similar to what you would receive in a callback.
You can use this information to update your user interface, but remember: never use it to update your database. The callback is the only reliable source for that.
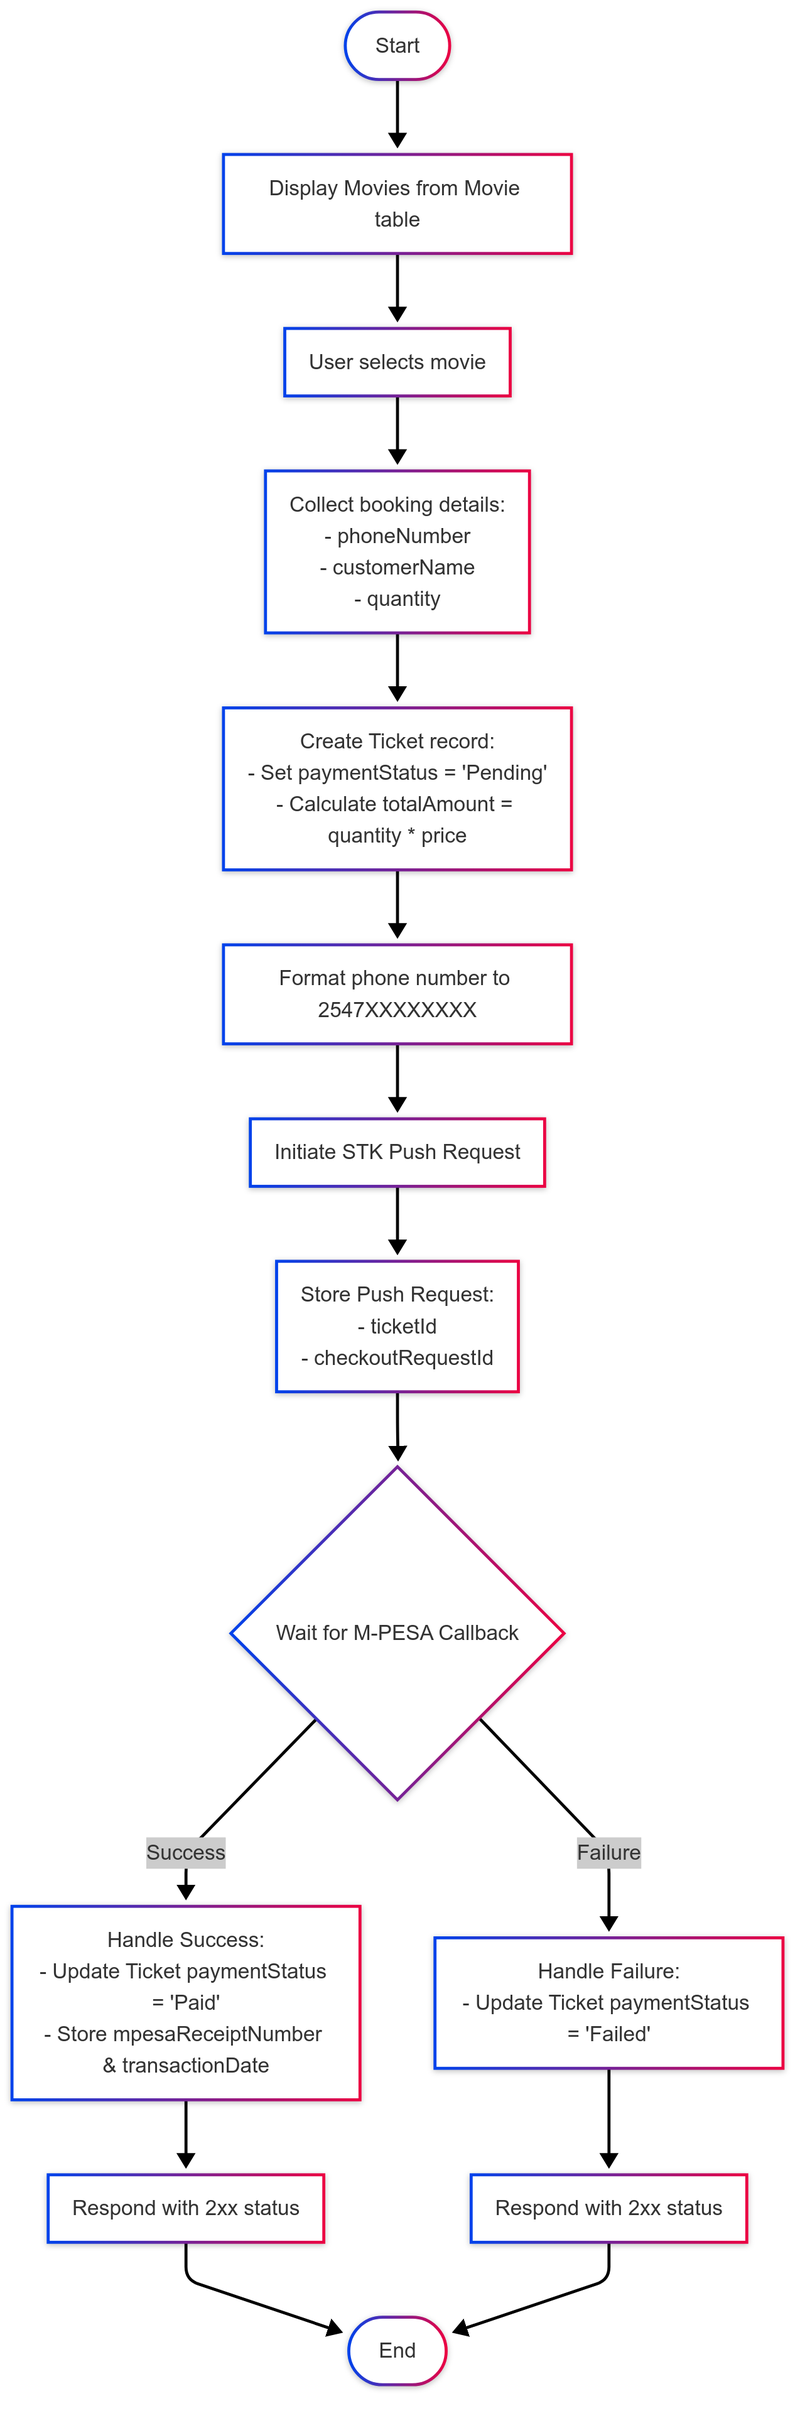
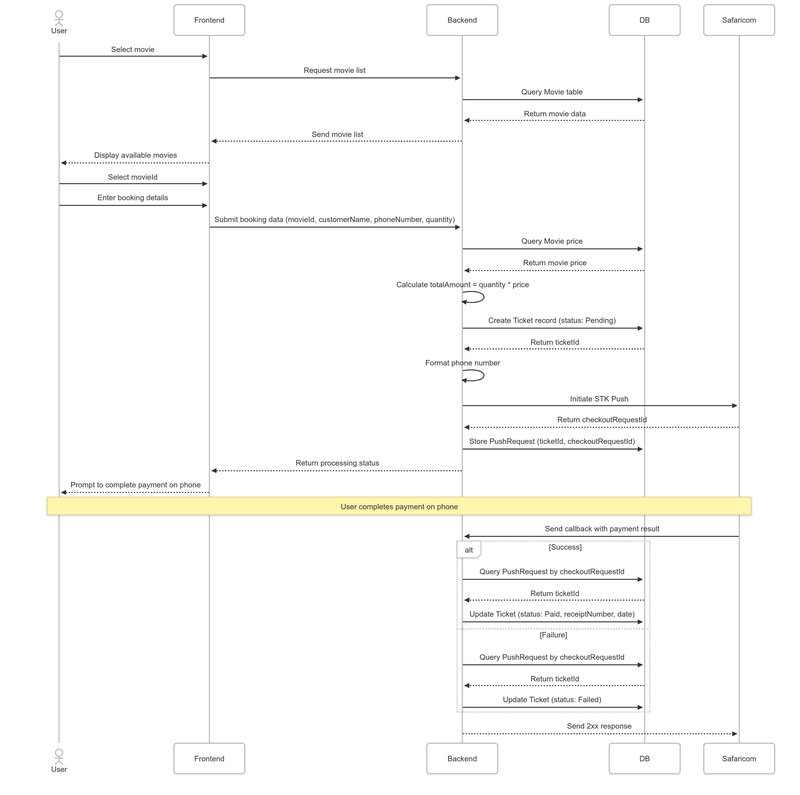
Let's review the complete flow from start to finish so you can see how all these pieces fit together in a real application.
Display Available Movies
Your application displays available movies by querying the movie table. Each movie shows its title, description, show time, and price.
User Selects a Movie
The user sees "Oppenheimer" and clicks "Book Now." This captures the movieId.
Collect Booking Details
The system presents a form:
- Customer name: "Baraza Michael"
- Phone number: "0114742348"
- Quantity: 3 tickets
The system shows the total: 3 tickets × 15 shillings = 45 shillings.
User Submits
The user clicks "Book Ticket." The frontend sends all this data to your backend.
Create Ticket Record
Your backend creates a ticket record in the database:
INSERT INTO ticket (movieId, customerName, phoneNumber, quantity, totalAmount, paymentStatus)
VALUES (4, 'Barasa Michael', '0114742348', 3, 45.00, 'Pending');
This returns ticketId = 67.
Format Phone Number
Convert 0114742348 to 254114742348.
Get Access Token
Make a GET request to the access token endpoint with your Consumer Key and Consumer Secret. Receive the access token.
Generate Password
Concatenate: 174379 + passkey + timestamp
Base64 encode the result.
Initiate STK Push
Make a POST request to the STK Push endpoint with all required parameters. Safaricom responds with:
{
  "CheckoutRequestID": "ws_CO_20052025195358733114742348",
  "ResponseCode": "0",
  "ResponseDescription": "Success. Request accepted for processing"
}
Store Push Request
Create a record linking the CheckoutRequestID to the ticket:
INSERT INTO pushrequest (ticketId, checkoutRequestId)
VALUES (67, 'ws_CO_20052025195358733114742348');
Wait
Your system waits. The user sees the prompt on their phone. They enter their PIN or cancel or ignore it.
Callback Arrives
Minutes later (or seconds, depending on the user), Safaricom sends an HTTP POST to your callback URL with the results.
A. If Successful
Extract the CheckoutRequestID from the callback. Query pushrequest table to find ticketId = 67. Extract receipt number and transaction date. Update the ticket:
UPDATE ticket
SET paymentStatus = 'Paid',
    mpesaReceiptNumber = 'TEE2QR5JMI',
    transactionDate = '2025-05-14 20:12:01'
WHERE ticketId = 67;
Send confirmation email/SMS to user. Respond to Safaricom with HTTP 200.
B. If Failed
Extract the CheckoutRequestID. Find the ticket. Update it:
UPDATE ticket
SET paymentStatus = 'Failed'
WHERE ticketId = 67;
Optionally notify user. Respond to Safaricom with HTTP 200.
User Interface Updates
Your frontend (through polling, WebSockets, or page refresh) detects that the ticket status changed. For success, it shows a confirmation message and ticket details. For failure, it shows an error and offers to retry.
That's the complete flow. Every payment integration you build follows this same pattern.
As you implement M-Pesa integration, keep these critical points in mind:
Access Tokens
- Request a fresh token for each API operation
- Don't try to manage expiration
- It's simpler and more reliable to just get a new token every time
Phone Number Formatting
- Remove the plus sign if present
- Replace leading zero with 254
- Always validate the format before making API calls
- This is a common source of errors, so pay close attention
Database Records First
- Always create your database record before initiating the STK Push
- Never do it the other way around
- You need that record to exist so you have something to update when the callback arrives
CheckoutRequestID is Critical
- Always store it and link it to your transaction record
- This is how you match callback results to the correct transaction
- Without this, you can't handle concurrent transactions properly
STK Push Response vs Payment Completion
- The STK Push response only tells you the prompt was delivered
- It does NOT mean payment is complete
- Never update your database based on the STK Push response alone
Callbacks Handle Everything
- Always process both success and failure cases in your callback
- Both require proper database updates
- Always respond to Safaricom with HTTP 200 after receiving a callback, regardless of payment outcome
Never Use STK Query for Database Updates
- Use it only for user interface enhancements if you use it at all
- The callback is the authoritative source of transaction results
- Rate limiting makes STK Query unreliable for critical operations
HTTPS is Mandatory
- Your callback URL must use HTTPS
- HTTP will not work
- Get a valid SSL certificate for your domain
Testing Thoroughly
- Test extensively in sandbox before moving to production
- Test every scenario you can think of: success, failure, cancellation, timeout
- Use 1 shilling for all sandbox tests to minimize costs
Production Credentials are Sacred
- Never commit them to version control
- Store them as environment variables or in secure configuration systems
- Only share with trusted team members who absolutely need them
The movie ticket booking example demonstrates the fundamental pattern, but M-Pesa integration applies to countless other scenarios. Understanding how to adapt this pattern to different use cases is valuable.
E-Commerce Checkout
The pattern is nearly identical to the movie example. Instead of a movie table, you have a product table. Instead of a ticket table, you have an order table and perhaps an order_items table for storing multiple products in a single order.
The user adds products to their cart, proceeds to checkout, and the system calculates the total. You create the order record, initiate the STK Push, and handle the callback to update the order status.
Booking Systems (Hotels, Flights, Trains)
You might have additional complexity around inventory management. When a user initiates a booking, you might temporarily reserve that seat or room while waiting for payment. If the payment succeeds, you confirm the reservation. If it fails or times out, you release the reservation back to available inventory.
The core payment flow remains the same—create the booking record, initiate STK Push, wait for callback, update based on results.
Subscription Services
You create a subscription record when the user signs up. The first payment works exactly like the examples shown. For recurring payments, you might use M-Pesa Ratiba, which is Safaricom's API for automatic recurring charges. The initial integration pattern remains the same, but you have additional functionality for managing renewals.
Bill Payment Systems
For utilities, service fees, or any kind of bill payment, the pattern is the same. You create a bill record or payment record, initiate the STK Push for the bill amount, and update the record based on the callback results.
In all these cases, the core flow never changes:
- Create a record before payment
- Initiate STK Push with the appropriate amount
- Wait for the callback
- Update your database based on the results
One challenge you'll face during development is the HTTPS requirement for callbacks. Safaricom requires that your callback URL use HTTPS, but local development environments typically don't have SSL certificates.
When you're developing on your local machine (localhost), you're usually running on HTTP, not HTTPS. But Safaricom won't send callbacks to HTTP URLs. Additionally, your localhost isn't publicly accessible—Safaricom's servers can't reach it even if they wanted to.
This creates a chicken-and-egg problem: you need to test callbacks to make sure your code works, but you can't receive callbacks during local development.
The practical solution is to use a tool called Ngrok. Ngrok creates a secure tunnel from a public HTTPS URL to your localhost, solving both problems at once:
- It provides a public URL that Safaricom's servers can reach
- That URL uses HTTPS, meeting Safaricom's security requirement
- It tunnels requests to your local development server
How Ngrok Works
You run Ngrok on your computer. It connects to Ngrok's cloud service and opens a tunnel. Ngrok gives you a public HTTPS URL like https://abcd1234.ngrok.io. When Safaricom sends a callback to that URL, Ngrok receives it and forwards it to your localhost (for example, localhost:5000).
Installing Ngrok
On Windows:
- Download from https://ngrok.com/download
- Unzip the file
- Optionally move
ngrok.exeto a directory in your PATH
On Linux:
wget https://bin.equinox.io/c/4VmDzA7iaHb/ngrok-stable-linux-amd64.zip
unzip ngrok-stable-linux-amd64.zip
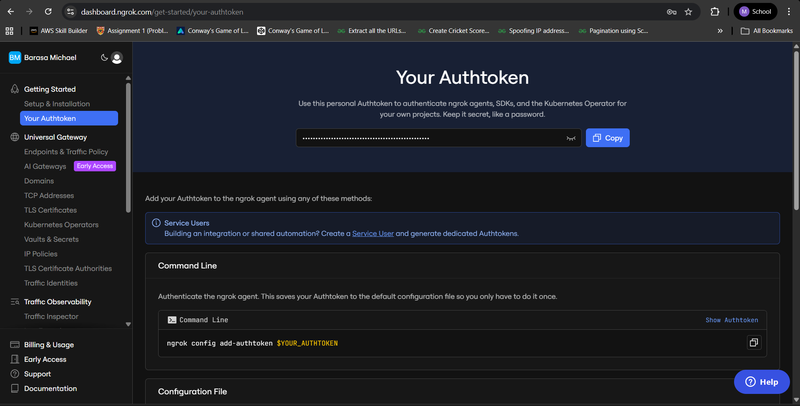
sudo mv ngrok /usr/local/binConfiguring Ngrok
- Create a free account at https://dashboard.ngrok.com
- Get your authentication token from the dashboard
- Configure ngrok with your token:
ngrok config add-authtoken YOUR_AUTHTOKENRunning Ngrok
If your local server is running on port 5000:
ngrok http 5000Ngrok will display output showing your public URLs. You'll see something like:
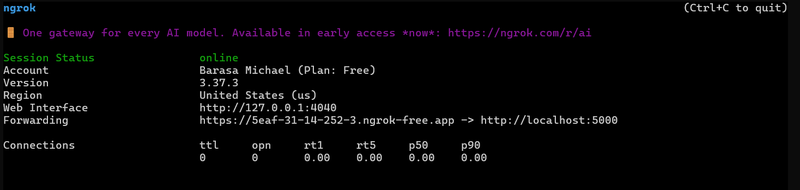
Use that HTTPS URL (https://5eaf-31-14-252-3.ngrok-free.app/api/mpesa/callback) as your callback URL in your M-Pesa API requests.
Important Notes
- Your local server must be running and handling POST requests at the specified endpoint
- The ngrok URL changes each time you restart ngrok (unless you pay for a static subdomain)
- Some secure networks (like university networks) may block ngrok, requiring a VPN or personal network
- Never use ngrok URLs in production—only for local development and testing
This setup allows you to develop and test locally while still being able to receive callbacks from Safaricom.
You've now learned the complete M-Pesa integration process from start to finish. Let's recap the journey:
You understand what a Daraja "app" really means—not a standalone application, but a set of credentials for your actual application to communicate with Safaricom's systems.
You know the difference between sandbox and production environments, and why you should do all your development and testing in sandbox before moving to production.
You understand the four fundamental concepts that make up M-Pesa integration:
- Access Tokens - How you authenticate with Safaricom
- STK Push - How you trigger payment prompts
- STK Query - How you optionally check status for UX
- Callback - How you receive definitive results
You've learned the critical importance of database design, specifically:
- Creating the ticket record before initiating payment
- Understanding the three payment states: Pending, Paid, Failed
- Why receipt numbers and transaction dates start as NULL
- How the
pushrequesttable links CheckoutRequestIDs to tickets
You understand phone number formatting requirements and why they matter.
You know every parameter required for an STK Push request and where each value comes from.
You grasp why the CheckoutRequestID is critical for handling concurrent transactions in production systems.
You understand the asynchronous nature of the process—how you initiate the push, then wait for Safaricom to send results via callback.
You know how to process both successful and failed callbacks, what to update in your database, and why you always send HTTP 200 back to Safaricom regardless of payment outcome.
You understand that STK Query is optional and only for user experience enhancement, never for database updates.
Most importantly, you understand the complete end-to-end flow and how all these pieces fit together in a real application.
The patterns you've learned here apply to any payment scenario. Whether you're building e-commerce, bookings, subscriptions, or bill payments, the fundamental flow remains the same. You've gained transferable knowledge that you can apply across countless projects.
M-Pesa integration might have seemed intimidating at first, but now you understand that it's really just a series of logical steps. Each step has a clear purpose. Each piece of data has a specific role. When you understand why things work the way they do, implementation becomes straightforward.
Start with sandbox. Test thoroughly. Build confidence in your understanding. And when you're ready, move to production and start processing real payments for real customers.
You now have the knowledge. The rest is just implementation.
Next Steps
In a follow-up article, we'll dive deep into the code implementation, showing you exactly how to build this integration in Python, PHP, and JavaScript. But for now, you have the conceptual foundation you need to understand M-Pesa integration completely. The implementation details will make much more sense because you understand the why behind every step.
No comments yet
Be the first to share your thoughts on this article!